Busting FPGA Blockchain Myths Part 4: Deploying the Application
Read Busting FPGA Blockchain Myths Part 3: Importing Ethash Code
For the final stage, we will build the application for hardware and deploy it.
Building
This step is fairly straight forward but will take some time to complete. Simply go back to the Application Project Settings tab and from the “Active build configuration” dropdown box and select “System”. Now just build the project as usual and wait. Depending upon your build system, this could take well over an hour to complete.
Once the system is built, we want to once again locate the two key output products:
- Host executable (e.g. ethash.exe or vadd.exe if it was never renamed)
- FPGA Binary (e.g. binary_container_1.xclbin is the default name)
Recall that these files are built for each build configuration so you want to make sure to locate the two under the “System” folder of the project.
Deploying
For deployment we will leverage Alveo accelerator cards available from cloud service provider Nimbix. Similar Xilinx accelerator clouds are also available through the AWS cloud but for simplicity we use Nimbix since it hosts the exact same Aveo U200 we targeted. Using Nimbix requires an account and a low hourly fee applies to the machines that host Alveo boards. However, testing your application can be done in a matter of minutes so the overall cost is very reasonable, if not negligible. Additionally, check for any promotional free time trials that may be available.
Once you have a Nimbix account you log into their cloud control panel named Jarvice. To navigate quickly to machines with Alveo cards ‘Xilinx’ can be selected from the ‘Vendors’ list or simply search for ‘Alveo’. An example is given below

Several images are listed but all of them will have the option to run on a machine with an Alveo card. In our case, we want to select the latest image with the latest version of development tools (2019.1 as of this article but could be a newer version). Selecting “Xilinx SDAccel Development 2019.1” (or similar) should present the option to launch the image in different ways. Since we want to use an actual card the “Desktop Mode With FPGA” is selected.

The next step allows you to select the type of Alveo card. The default selection should be good as it should correspond to a U200.
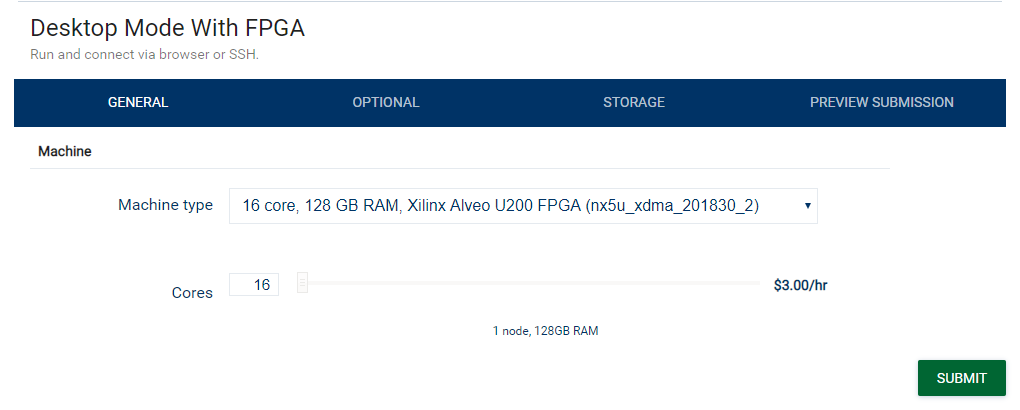
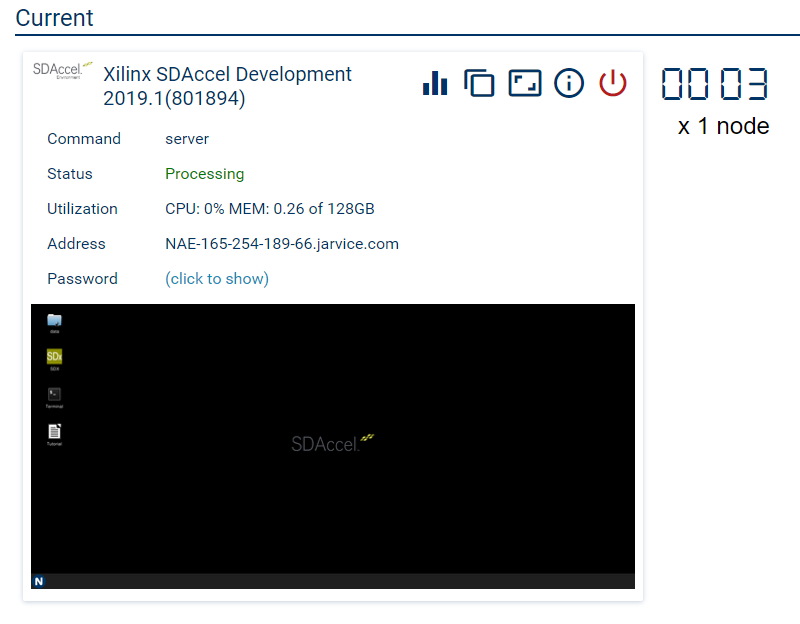
After the selection is submitted the Jarvice view should switch from the Compute window to the Dashboard window from which the status of the image can be seen. For example:

Once the launching of the image is complete a screenshot of the desktop will be presented. Simply clicking the desktop will open a new browser window for interacting with the machine. For example:
From the desktop, we open the terminal and can issue the “xbutil list” command as shown below.
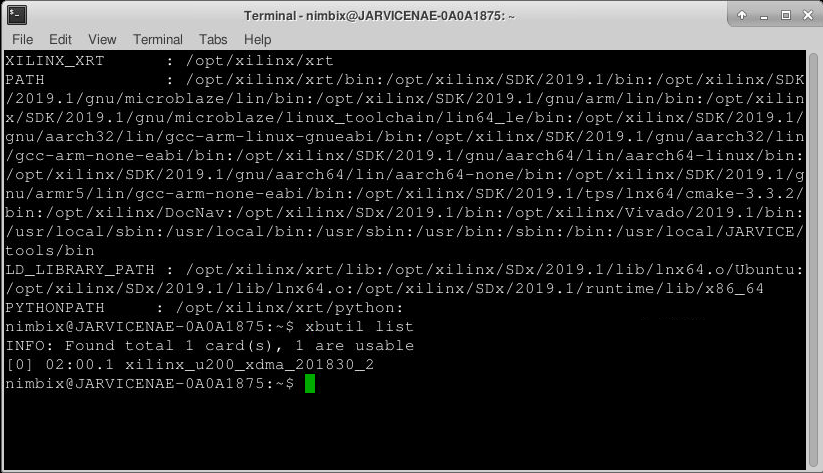
xbutil is a utility provided by the Xilinx run-time (XRT) stack and the list option will list available boards. As seen above, the machine found a single U200 card. We can also see some important environment variables that were set when the terminal was open. These variables are used by XRT.
Listing the contents of your home directory will reveal ‘data’ directory. This directory will be used as a personal workspace and is also making available for remote file transfer. Its initial contents will be empty, but let’s transfer the compiled program and associated data (DAG). Since transferring the DAG can take some time, we’ll also terminate the image for now.
Before transferring files, an account API key will be needed. This can be found back in the Jarvice control panel by selecting the Account window. This will window will provide some authentication info which includes the “API Key”. Using this key, any common file transfer client that supports SFTP (i.e. SSH FTP) will do the trick. The client will be used to connect to “drop.jarvice.com”. An example of settings from FileZilla is shown below.
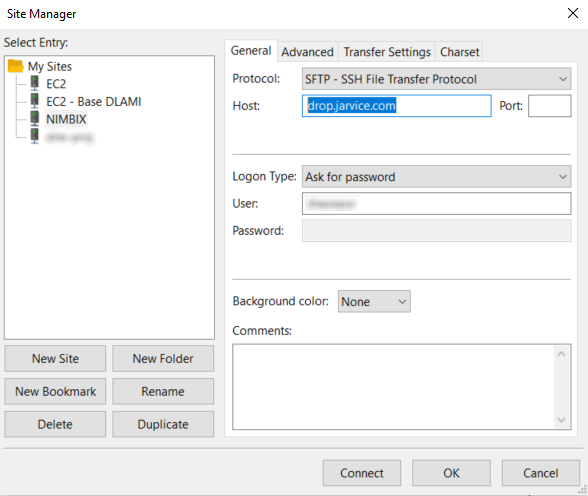
When connecting, the API Key will be used as the password.
With the connections established we transfer:
- The host executable (*.exe)
- The kernel binary (*.xclbin)
- The DAG (dataset)
Once the transfers are complete you can return to the Jarvice control panel to restart the same image (assuming it was terminated prior to transferring files). Once the image has started again we can return to the remote desktop and run the host program from the terminal, also passing it the *.xclbin as an argument. The example code assumes the dataset is located in the parent directory so an argument for the DAG isn’t required. Below is an example.
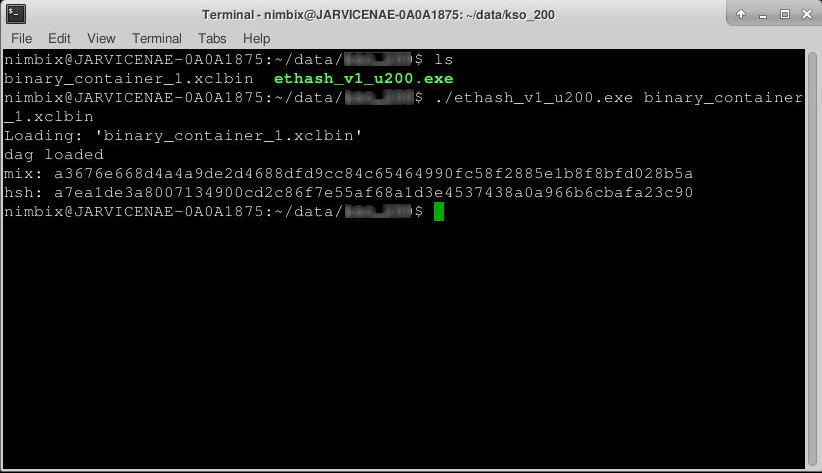
***Don’t forget to terminate your Nimbix session after you’re done running the application!***
It’s also worth noting that back in the Vitis tool.
tool under “System” reports within the Assistant tab you could review the Profile Summary for the actual hardware build to revisit latencies and performance. However, since this article didn’t focus on the optimization of the kernel, there won’t be anything all that interesting to see there with respect to what was already seen from hardware emulation results.
Lastly, before closing out, just a few tips on optimization for any reader interested in taking this to the next step.
- The performance of the actual kernel can be inspected and visualized with the Xilinx HLS tool. In particular, the tool offers an Analysis view for detailed inspection of kernel loops and associated latencies. Using this tool, along with the reports already reviewed in this article, provides plenty of evidence that the serial nature of much of the code needs to be explicitly parallelized. In other words, the gaps between memory read needs to be shortened
- For simplicity, we only performed a single hash operation. But a quick look at reports would reveal that very little FPGA resources have been used. To maximize utilization and parallelism the kernel should be extended to loop over multiple ‘nonce’ values. This is similar to how OpenCL kernels are optimized for specific GPUs.
- Am individual kernel, by default, connects to just one global memory bank of the Alveo card. Either the kernel should be changed to leverage all available banks or multiple instances of the kernel instantiated for each bank.

About Shaun Purvis
Shaun Purvis is a Processor Specialist Field Application Engineer (FAE) covering Eastern Canada. He works across a variety of industries, including Wired/Wireless Communications, Audio/Video Broadcast, and Industrial Vision, supporting embedded applications as well as artificial intelligence (AI) solutions. Prior to AMD Shaun worked at a consulting company as an ARM processor and AMD SoC specialist where he did a lot of globetrotting and training as the embedded industry embraced these technologies. Shaun grew up on the West Coast of BC, graduated from McGill University, and started his professional career in California. He now lives with his family in Montreal where he enjoys scaling up mountains in summer and sliding down them in winter.